
A practical decision process for comparing the forecast with the route, building a weather buffer, preparing a Plan B, and knowing when the hiking plan needs to change.
Weather and trail conditions can change during a day hike, and conditions on the route may differ from those at the trailhead or in a nearby community. The goal is not to predict every change perfectly. It is to prepare options that make it easier to modify, shorten, postpone, or end the hike when the plan no longer fits.
This guide provides a practical decision process for beginner and beginner-intermediate hikers on established, non-technical day-hiking trails in the United States and Canada. It will help you define the hike, check official information, compare the forecast with the route, prepare a practical buffer, create a Plan B, and decide when the plan needs to change. Preparation can preserve options, but it cannot eliminate weather uncertainty or make an unsuitable plan safe.
SAFETY NOTE
Weather, trail conditions, and individual abilities can vary significantly. Check current local forecasts, park alerts, and trail conditions before departure. Change or cancel your plan when conditions exceed your experience or preparation. This guide does not replace professional instruction, medical advice, park guidance, or emergency services.
Start With the Hike You Are Actually Planning
Weather information becomes useful when it is compared with a specific route. Conditions on a higher, more exposed, or shaded trail may differ materially from a nearby low-elevation forecast, while a longer route increases the time during which conditions may change. Before comparing multiple forecasts, define the trip itself.
Trail type and technical difficulty
This guide is limited to established, non-technical day-hiking trails. It does not cover scrambling, glaciers, avalanche terrain, off-trail backcountry travel, exposed climbing, technical water crossings, or specialized rescue. For those activities, use guidance from the responsible land authority and qualified instruction specific to the activity.
Distance, duration, and turnaround time
Base the schedule on a realistic group pace, including the participant likely to need the most time. Include breaks, navigation delays on the established route, and time to adjust clothing or modify the plan. Set a planned turnaround time before departure, based on the expected return, available daylight, and the group’s realistic pace.
Terrain, elevation, and exposure
Identify the sections where weather matters most: open ridges reached by established trail, exposed shorelines, steep or muddy descents, confusing junctions or temporarily obscured sections of an otherwise established trail, or areas where retreat would take longer. As exposure increases or quick retreat becomes more difficult, the plan needs more conservative timing, alternatives, and turnaround criteria.
Group experience and individual limits
A plan should reflect the least experienced participant, not the strongest. Consider mobility, comfort in wet or windy conditions, familiarity with the route, known personal limitations, any professional medical guidance relevant to a participant, and whether each person has clothing appropriate to the expected conditions. The same route and forecast can require different decisions for different groups.
DECISION POINT
If the route already depends on perfect weather, fast travel, or equipment you have not used before, simplify it before checking the forecast.
Check More Than the Temperature
The daytime high is only one part of the decision. Check the timing and location of conditions across the hours when you expect to be outside. Use official forecasts and alerts as the starting point, then compare them with local park or trail information. For a detailed breakdown of the forecast elements that matter, see What to Check in a Weather Forecast Before a Hike.
Precipitation timing and intensity
Look at when rain or snow is expected, how long it may last, and whether the forecast mentions heavier periods. Even modest precipitation may become more consequential when combined with wind, cooler conditions, surfaces or trail sections that become harder to travel when wet, or a long return to the trailhead.
Wind and gusts
Check both sustained wind and gusts, but do not treat one wind number as a universal go-or-no-go threshold. Consider how the forecast wind interacts with exposed terrain, the group, the route direction, and any official warnings.
Visibility and cloud cover
Low cloud, fog, smoke, or heavy precipitation can reduce visibility and make even a marked trail harder to follow. Consequences increase near exposed terrain, confusing junctions, or poorly defined sections of an otherwise established trail. When reduced visibility is plausible, choose an alternative with clearer navigation, less exposure, and easier retreat.
Thunderstorms and official alerts
Check whether official forecasts or alerts indicate thunderstorm risk during the hours of travel. The U.S. National Weather Service states that no outdoor location is completely safe from lightning and identifies a substantial enclosed building or an enclosed hard-topped vehicle as the appropriate shelter options. Do not rely on equipment or a simple outdoor technique to manage lightning exposure. When official forecasts or alerts indicate thunderstorm risk during the planned travel period, choose a plan that avoids exposed travel and provides access to appropriate shelter, or postpone the hike.
Air quality, heat, or cold when relevant
Wildfire smoke and poor air quality may justify modifying or rescheduling a hike. Use current official air-quality and public-health information for the location. In Canada, the Air Quality Health Index provides location-based health messages. Follow current public-health messages for the location, and consult an appropriate healthcare professional for personal medical limits.
Compare the Forecast With Local Trail Conditions
A forecast describes atmospheric conditions. A trail report describes current effects on the route. Check both. Official park or trail alerts may identify closures, restrictions, flooding, damaged infrastructure, mud, ice, fallen trees, or other local conditions that a general forecast cannot show. The absence of a reported problem does not confirm that the route is clear or suitable. National Park Service and Parks Canada guidance both direct hikers to check current alerts and trail conditions.
Use the most local responsible authority available: the park, forest, conservation area, state or provincial agency, municipality, or trail manager. Recent non-official reports may add context, but they can be incomplete or inaccurate and never override an official closure, warning, or restriction.
Identify the Most Exposed Part of the Hike
Identify the point where worsening conditions would reduce options most sharply. It may be an open ridge, a long exposed return, a low section reported as flooded or impassable, or a point after which turning around would add substantial time.
Ask three questions: How long will it take to reach that point? How long will it take to leave it? What observable change would make the group turn around before entering it? This creates a defined decision point rather than relying on optimism.
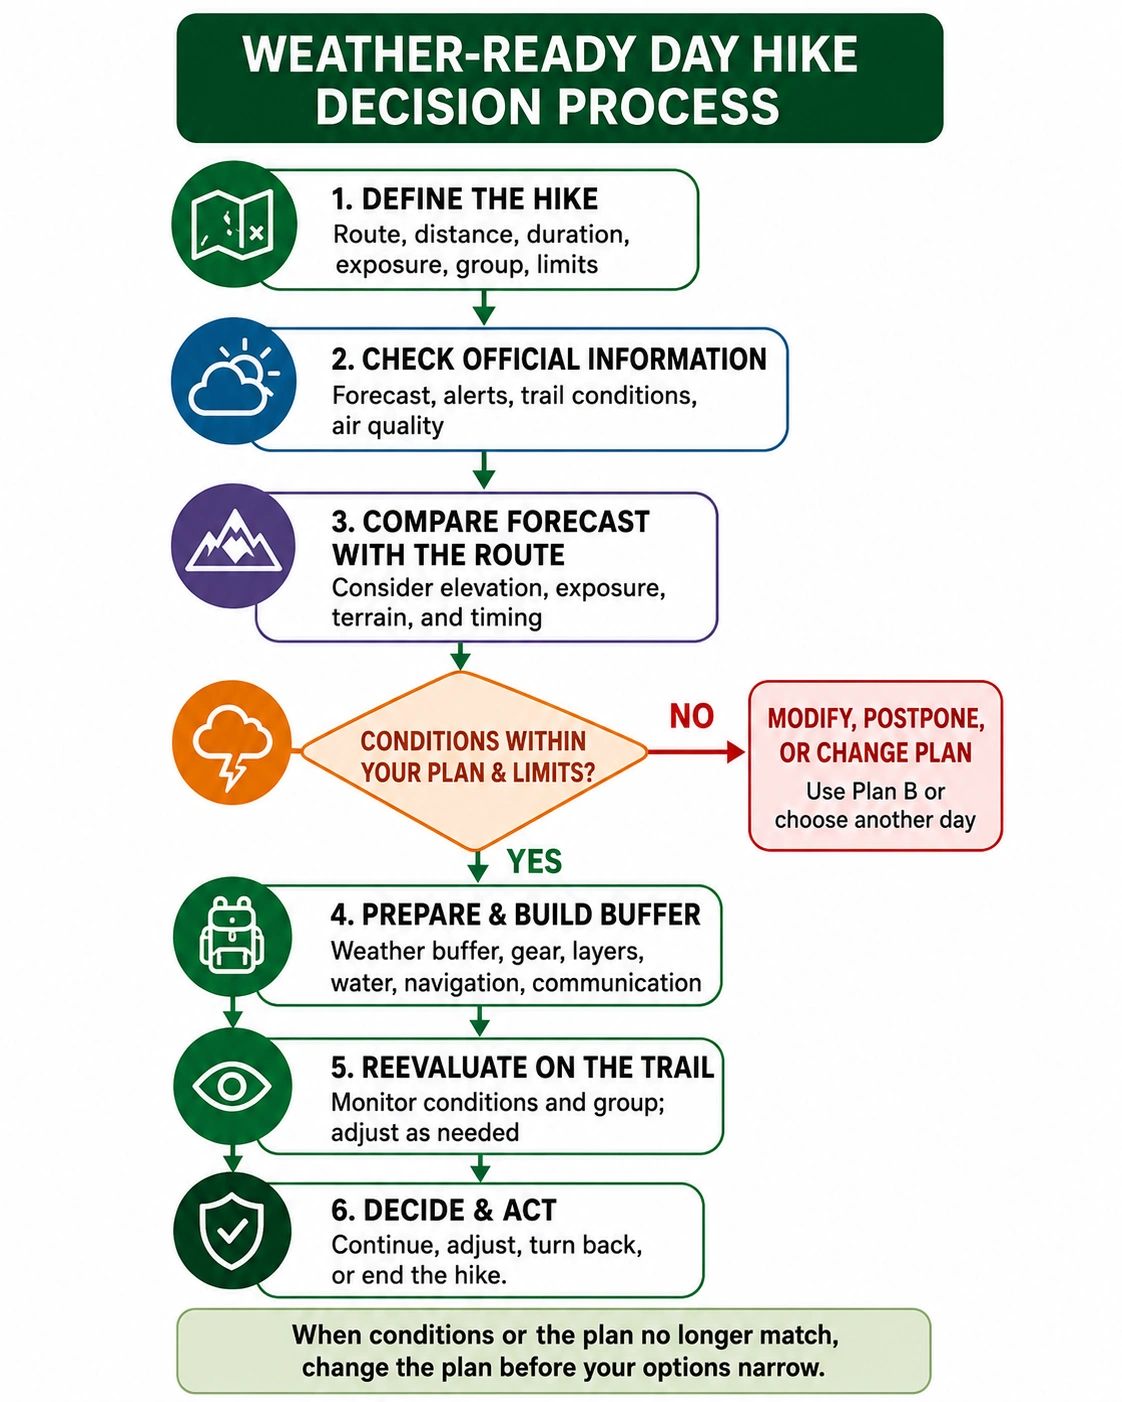
Tap the diagram to view it at full size.
Build a Practical Weather Buffer
A weather buffer is extra margin in time, route choice, clothing, essential equipment, and retreat options. It should match the route, season, forecast, and group. A buffer can preserve choices when conditions differ from expectations; it does not make an unsuitable route or forecast acceptable.
Clothing layers
Choose clothing that can be adjusted as effort and conditions change. Carry additional insulation when the route, temperature range, or plausible delay justifies it. Detailed layering methods belong in the dedicated Layering Tutorial.
Rain and wind protection
Bring rain and wind protection appropriate to the forecast and exposure. Such protection may reduce exposure, but it does not make a poor route choice acceptable. Detailed packing and moisture-protection methods belong in the Packing Guide.
Dry backup essentials
Include dry backup items when the route, forecast, season, and plausible delay justify them. The appropriate combination varies; use the dedicated Packing Guide rather than treating a short universal list as sufficient.
Food, water, light, and communication
Plan food and water for the expected duration and a plausible delay, following local authority guidance and the needs of the group. Carry a light source and check the route-specific navigation and communication requirements. Do not assume mobile service will be available or rely on a phone as the only navigation plan. Leave the route and expected return time with a responsible person. Parks Canada recommends sharing a trip plan, which can provide useful information if the group becomes overdue.
Create a Plan B Before You Leave
A Plan B is not merely ‘be careful.’ It is a specific lower-exposure, shorter, or easier-to-exit alternative that the group can adopt quickly when the original plan no longer fits current information. It must still be checked against current forecasts, alerts, closures, and the group. The National Park Service recommends having another activity ready when weather or other conditions are not suitable for the original hike.
On mobile, swipe horizontally to compare all columns.
| Original concern | Possible adjustment |
|---|---|
| Storm timing overlaps exposed terrain | Start earlier only if official forecasts and local conditions support it, or choose a sheltered route. |
| Strong wind on an open ridge | Select a lower, forested route or shorten the objective. |
| Poor visibility expected | Choose a clearly marked route without exposed or complex navigation. |
| Trail conditions are worse than expected | Use a shorter alternative, change activities, or postpone. |
| The group is under-equipped or uncomfortable | Do not improvise around missing essentials; select a simpler plan. |
Define Your Turnaround Criteria in Advance
Turning around is a normal outcome of good planning, not evidence that a hike failed. Before departure, identify a small set of clear reasons to modify or end the attempt, such as reaching the planned turnaround time, encountering worse-than-expected visibility or wind, receiving an official thunderstorm alert, observing thunder, falling substantially behind the schedule, or finding that the route or group no longer matches the plan.
Do not wait for every factor to become severe. Several smaller problems can combine. For example, a delayed start, wet clothing, slower progress, and deteriorating weather may justify turning back even when no single factor appears decisive.
For a focused on-trail turnaround decision framework, see When Should You Turn Back During a Hike?
BEGINNER NOTE
Set the turnaround rule before the group becomes emotionally invested in reaching the destination.
Recheck Before Departure
Complete this final check as close to departure as practical:
- Updated official forecast for the route area and the hours of travel.
- Active weather, air-quality, fire, flood, or other relevant alerts.
- Current park and trail conditions, closures, and restrictions.
- Expected daylight and the planned turnaround time.
- Route, map, communication plan, and Plan B.
- Clothing, weather protection, food, water, light, and route-specific navigation and communication requirements.
- Whether the plan still matches the least experienced participant.
If the updated information materially changes the route, timing, exposure, or group fit, make the decision again. Before departure, the practical outcomes are: continue with the original plan, modify it, use Plan B, or postpone or cancel. After departure, the equivalent outcomes include modifying the route or turning back.
Reassess During the Hike
A pre-trip forecast is not the final decision. Reassess at natural checkpoints such as trail junctions, the edge of exposed terrain, the planned turnaround time, a significant change in wind or visibility, or any point after which retreat would become more difficult.
Ask:
- Are conditions matching the forecast, improving, or deteriorating?
- Is the group moving at the expected pace?
- Is anyone showing unusual fatigue, confusion, difficulty keeping warm, distress, or another reason to stop and reassess?
- Do we still have enough daylight and time margin for the return?
- Will the next section materially reduce our ability to turn back?
Choose the Appropriate Outcome
Continue only while current conditions, remaining daylight, route exposure, group capacity, and retreat options still support the plan. When they no longer fit, modify the route or timing, switch to Plan B, or turn back before the available options narrow further. Base the decision on current conditions and remaining options, not on proximity to the destination.
For non-immediate route problems, follow instructions from the responsible land authority and use the communication plan prepared for the trip. Personal medical questions require an appropriate healthcare professional.
EMERGENCY
If there is an immediate threat to life or safety, contact local emergency services.
United States and Canada: Use the Local Authority
United States
Use National Weather Service forecasts, watches, warnings, and other applicable official information for the route area. Then check the responsible National Park Service unit, state park, forest, municipality, or trail authority for current conditions, restrictions, and closures. The responsible local authority takes priority over a general planning article.
Canada
Use Environment and Climate Change Canada forecasts and warnings, plus Air Quality Health Index information when relevant and available. Then check Parks Canada or the responsible provincial, territorial, municipal, conservation, or trail authority for current conditions, restrictions, and closures.
Local park and trail authorities
National services provide weather and alert information, while local land managers provide route-specific conditions and closures. The responsible authority varies by location; do not assume the same agency structure applies across every state, province, or territory.
Key Takeaways
- Define the route, exposure, group, schedule, and turnaround point before interpreting the forecast.
- Check official forecasts, alerts, air-quality information when relevant, and current trail conditions.
- Compare those conditions with the route and identify where worsening weather would reduce your options most.
- Prepare a practical buffer, a specific Plan B, and clear reasons to modify or end the hike.
- Recheck before departure and reassess on the trail. Continue, modify, use Plan B, postpone, or turn back according to the current fit between the plan and conditions.
Explore the full Weather-Ready Day Hiking guide series.
Sources and Further Reading
- National Park Service – Hike Smart
- National Weather Service – Lightning Safety Outdoors
- Parks Canada – How to Prepare for a Hike
- Environment and Climate Change Canada – Weather Information and Alerts
- Environment and Climate Change Canada – Air Quality Health Index
- Parks Canada – Hiking Tips – Rouge National Urban Park