
A forecast can look simple: an icon, a temperature, and a percentage beside a rain cloud. For a day hike, that summary is not enough. The useful question is not whether the forecast looks “good.” It is whether the expected conditions match the route, the hours you will be outside, the group, and the options available if the plan needs to change. The practical outcome is to continue with the original plan, modify it, use a lower-exposure alternative, or postpone or cancel.
This guide is for beginner and intermediate hikers planning non-technical day hikes on established trails in the United States or Canada. It covers trails that do not require scrambling, climbing, glacier travel, avalanche assessment, technical water crossings, or mountaineering skills. It explains which forecast elements to check, how to combine them, and how to translate the result into a planning decision. For the complete preparation process—including route definition, backup planning, turnaround criteria, and pre-departure checks—see How to Prepare for a Day Hike When the Weather Can Change Quickly. This guide does not declare a hike safe, replace current alerts or closures, or provide universal limits for acceptable weather.
Decision Point:
Use the forecast to choose among four practical outcomes: continue with the plan, modify the timing or route, select a lower-exposure alternative, or postpone or cancel.
Start With the Hike Location and Travel Period
Before reading any forecast value, define where and when the hike will occur. A forecast is only useful when its location and time period are reasonably matched to the plan.
Route Area, Elevation Context, and Exposure
Choose the official forecast point or region that most closely represents the route area rather than relying automatically on the nearest city. Conditions on a higher, more exposed, or terrain-influenced trail may differ from conditions in a nearby lower-elevation community. Local ridges, valleys, and elevation can affect wind, cloud, precipitation, and temperature-related conditions, but the size of those differences is location-specific.
The forecast does not need to match every metre of trail. It should, however, be relevant enough to help you identify the conditions likely to matter on the route. When an established non-technical trail includes an open ridge, summit area, exposed viewpoint, or another section with limited shelter, note that exposure before deciding whether the forecast matches the plan.
Departure, High-Exposure, and Return Windows
Check the hours when the group expects to depart, reach the most exposed or consequential section, and return. A daily icon can hide important changes within the day. An hourly forecast may show that wind, precipitation, visibility, heat, cold, or thunderstorm risk is expected to change while the group is still on the trail.
Use the expected schedule as a planning window, not as a guarantee. Delays, a slower group pace, or changing trail conditions can extend the time spent outside.
Use Official Forecasts, Alerts, and Local Conditions
Start with the responsible national weather authority, open any active alert in full, and then check the park or land manager responsible for the route. A weather app may display useful or official data, but a daily icon, headline, or simplified screen can omit the full alert text, location limits, timing, or route-specific information.
United States Source Path
In the United States, begin with the National Weather Service point forecast, hourly forecast information, and active hazards for the route area. Available products and detail can vary by location and forecast office. Then check the responsible land manager, such as the National Park Service, U.S. Forest Service, a state park, tribal authority, county, municipality, or another local agency. The local authority remains the source of truth for closures, restrictions, and current trail information within its jurisdiction.
Canada Source Path
In Canada, begin with Environment and Climate Change Canada forecasts, WeatherCAN, and current alerts for the relevant forecast region. Environment and Climate Change Canada currently uses impact-based, colour-coded warnings, advisories, and watches. Open the current alert for its location, timing, expected impacts, forecast confidence, and recommended action. Then check Parks Canada or the responsible provincial, territorial, municipal, conservation, or local land authority. Canadian alert categories, colours, and air-quality messages should not be interpreted as direct equivalents of U.S. products.
Why a Forecast Summary Is Not Enough
A general weather app can be convenient for an initial look and may display official data. A daily icon or brief summary, however, does not replace the detailed forecast, the full text of current official alerts, and route-specific information from the responsible authority. Open each alert and follow the action it recommends rather than treating alert names as a single universal severity scale.
Check Precipitation Timing and Type
The National Weather Service defines probability of precipitation as the probability that precipitation will be reported at a certain location during a specified period. The percentage alone does not tell you how long precipitation may last, how intense it may be, or what it will mean for a particular trail.
Check the expected timing, type, and any accompanying alert or discussion. Rain, snow, freezing precipitation, or mixed conditions can have different consequences depending on the route, season, surface, exposure, and return time. The relevant decision is not “Is the percentage low enough?” but “What would this precipitation change on this route during these hours?”
Check Wind and Gusts
Check both forecast wind and gust information when available. Shorter periods of stronger wind may matter differently from the general wind forecast, especially on an open ridge, exposed viewpoint, or open high-elevation section reached by an established non-technical trail. Local terrain can also produce conditions that differ from a nearby general forecast.
Do not use a universal wind number as a go/no-go rule. Consider the forecast together with exposure, precipitation, visibility, temperature-related conditions, group experience, and the availability of a lower-exposure alternative with a simpler and more direct return.
Check Thunderstorm Risk and Official Alerts
Thunderstorm and lightning risk requires a conservative decision. Check the current forecast and all active alerts for the full travel period. National Weather Service guidance states that no outdoor location is fully safe during a thunderstorm. Appropriate shelter planning and current official guidance therefore matter more than trying to manage lightning while exposed on the route.
When thunderstorm risk overlaps the planned travel period, reconsider the timing or route using current official guidance. Do not rely on managing lightning while remaining outdoors. If the plan cannot reasonably avoid outdoor exposure during the indicated risk period and provide access to the shelter identified by current official guidance, postpone the hike. Do not rely on a universal “safe hour” or assume that a storm will follow the same timing as a previous day.
Safety Note:
Weather information changes. Open the current official alert and follow the responsible authority’s instructions. This article does not replace local lightning guidance or emergency directions.
Check Temperature-Related Conditions
Temperature should be read in context rather than treated as a single acceptable or unacceptable number. Check how conditions are expected to change from departure through the return, and consider precipitation, wind, sun exposure, shade, elevation context, and the time the group expects to spend outside.
A temperature that appears moderate in a nearby town forecast may not describe conditions along the full route. The planning decision should account for the expected range and the consequences of delay, without assuming that one clothing choice or one forecast value makes the plan suitable. Detailed layering and packing methods belong in the dedicated support guides.
Check Visibility, Cloud, and Fog
Reduced visibility can make even an established trail harder to follow. Consequences increase near exposed terrain, confusing junctions, open viewpoints, or sections where landmarks are important. Cloud, fog, heavy precipitation, or smoke may also remove a viewpoint or visual objective that is central to the planned hike.
If the plan depends on clear visibility, choose an established alternative with fewer confusing junctions, less exposure, and a simpler and more direct return in the expected conditions. A marked trail should not be treated as automatically suitable when visibility is poor.
Check Air Quality or Smoke When Relevant
Wildfire smoke and poor air quality can change during the day and may support shortening the planned activity, choosing another location or time, or rescheduling according to the current official message. In the United States, use AirNow and applicable state, local, or tribal agency messages. In Canada, use the Air Quality Health Index and location-specific guidance where available.
Keep the systems separate: U.S. AQI and Canadian AQHI categories are not interchangeable. Follow the current public-health message for the location. Readers with personal medical concerns should seek guidance from an appropriate healthcare professional rather than relying on a general hiking article.
Combine Conditions Instead of Reading One Number
Forecast elements do not act independently. Several moderate conditions can combine into a plan that is less suitable even when no single value appears extreme. This is an MCD Outdoor decision framework, not an official weather formula.
Examples of Interacting Conditions
- Light or intermittent precipitation plus wind and a long exposed return.
- Moderate warmth plus smoke, direct sun, and limited shade.
- Cooler conditions plus rain, slower progress, and reduced remaining daylight.
- Fog or low cloud plus a viewpoint-dependent objective and confusing junctions.
- Gusty conditions plus an open ridge and a group unfamiliar with how those conditions affect the route.
These examples do not establish thresholds. They show why the planning question must be based on the full combination of route, timing, exposure, group, and current official information.
Avoid Universal Thresholds
A single wind speed, temperature, precipitation percentage, visibility value, or air-quality category cannot determine whether every hike should proceed. Route exposure, duration, surface conditions, local guidance, group capacity, and available alternatives all matter. When an authority issues a closure, restriction, alert, or recommended action, that instruction takes priority within its jurisdiction.
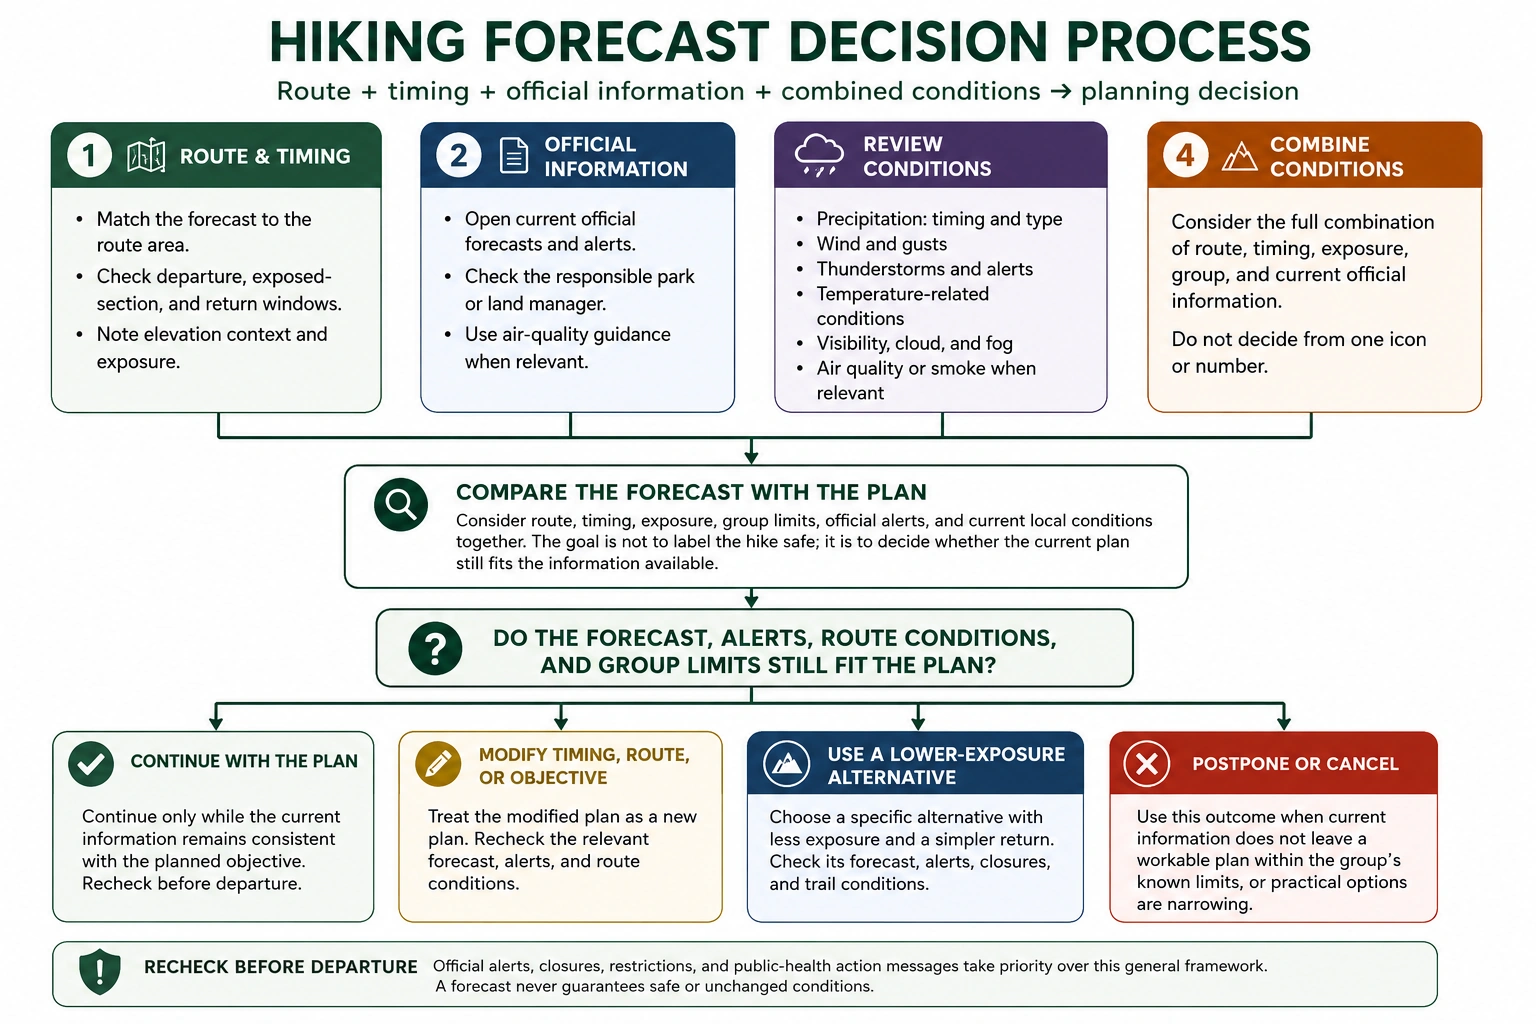
Select the diagram to view it at full size.
Translate the Forecast Into a Planning Decision
After reviewing the relevant conditions, choose an outcome. The purpose of this step is not to label the hike safe. It is to preserve options before the group is committed to the original plan.
For on-trail decisions after departure, see When Should You Turn Back During a Hike?
Continue With the Plan
Continue only when the forecast period, active alerts, route exposure, local conditions, group limits, and return plan remain consistent with the planned objective. This does not confirm that conditions will remain safe or unchanged. Keep a recheck point before departure because the conclusion can change.
Modify Timing, Route, or Objective
A modification may mean changing the departure time, shortening the route, removing an exposed objective, choosing a simpler return, or changing the destination. A timing change is appropriate only when the updated forecast and alerts support the new travel period. Recheck the modified plan as a new plan rather than assuming that one adjustment solves every concern.
Use a Lower-Exposure Alternative
A useful alternative is specific, accessible, and provides a simpler and more direct return in the expected conditions. It might avoid an open ridge, summit, long return, or visibility-dependent objective. The alternative still requires its own forecast, alert, closure, and trail-condition check.
Postpone or Cancel
Postponement is appropriate when the forecast and local information do not leave a workable plan within the group’s known limits, or when uncertainty affects a part of the route where worsening conditions would leave few practical options. Cancelling or postponing is a normal planning outcome, not a failed hike.
Recheck Before Departure
Recheck during planning and again as close to departure as practical: review the official forecast, active alerts, air-quality information when relevant, and the responsible land manager’s current conditions. There is no universal recheck interval. The appropriate timing depends on how quickly the situation may change, the length of travel to the trailhead, and the authority’s update schedule.
Confirm that the group is still using the same route, schedule, and alternative that were evaluated. A changed departure time or objective can change which forecast period and exposure matter.
When the Forecast Is Not Enough
A forecast cannot confirm that a trail is open, clear, passable, or suitable for the group. Check current closures, restrictions, access conditions, and trail reports from the responsible park or land manager. The absence of a reported problem does not confirm that the route is clear or appropriate.
Route-specific questions may require the local land authority. Personal medical questions require an appropriate healthcare professional. Technical terrain, avalanche conditions, glacier travel, and mountaineering weather fall outside this article and require the relevant official authority or an appropriately qualified guide or instructor.
Use This Five-Step Forecast Check
- 1. Match the official forecast to the route area and hours of travel.
- 2. Open current official alerts and check the responsible land manager.
- 3. Review precipitation, wind and gusts, thunderstorms, temperature-related conditions, visibility, and air quality when relevant.
- 4. Combine the conditions instead of deciding from one icon or number.
- 5. Choose whether to continue, modify, use a lower-exposure alternative, or postpone or cancel.
Recheck before departure. An official alert, closure, restriction, or public-health action message takes priority over this general framework, and a forecast never guarantees safe or unchanged conditions.
Explore the full Weather-Ready Day Hiking guide series.
Sources and Further Reading
- National Weather Service — Hourly Weather Forecast Graph
- National Weather Service — Probability of Precipitation Glossary
- National Weather Service — Safety Messages and Alerts
- National Weather Service — Lightning Safety Outdoors
- Environment and Climate Change Canada — Weather Information
- Government of Canada — Weather Alerts
- AirNow — Using the Air Quality Index
- Environment and Climate Change Canada — AQHI Health Messages
- Parks Canada — How to Prepare for a Hike
- National Park Service — Hike Smart